Thursday, June 21, 2012

Bagginses

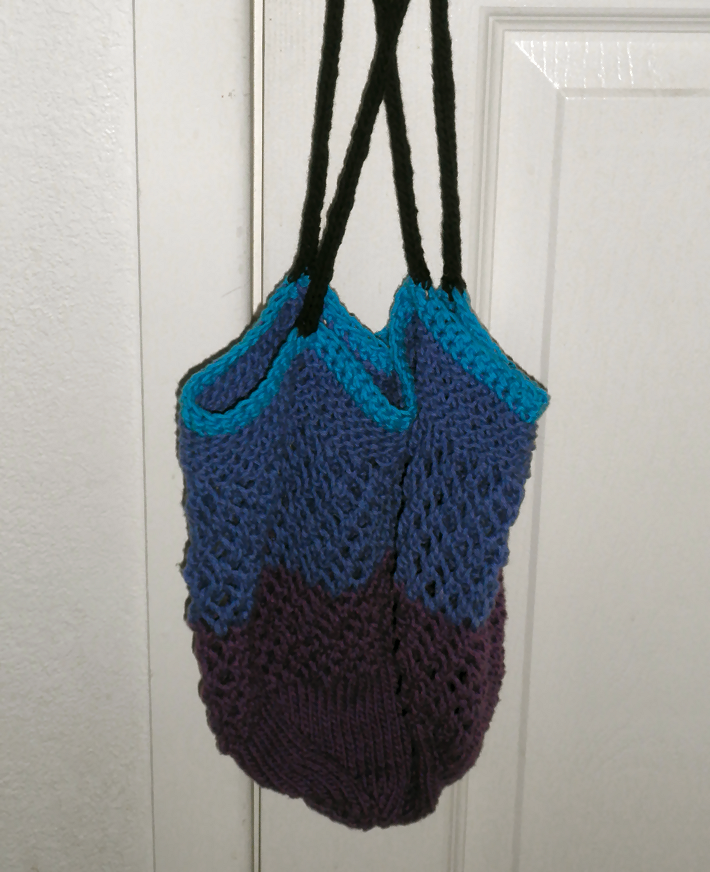
This is a prototype, made by request for a friend. She actually needed a whiter yarn,and a bigger, taller bag. The version pictured here is 6" wide by 9" tall. It's a good size to hold a Kindle or a paperback book, a small knitting project, and/or sundry other accouterments.

Hers is 8" wide by 12" tall; you could stuff a whole bunch of thingies in there. I'll leave the what to your imagination. I didn't get pictures of the one I made for her, but it's this one's big brother, pretty much. And white.
Gauge:  18 stitches/20 rows = 4 inches

Needles: U.S. 6 or size needed for gauge

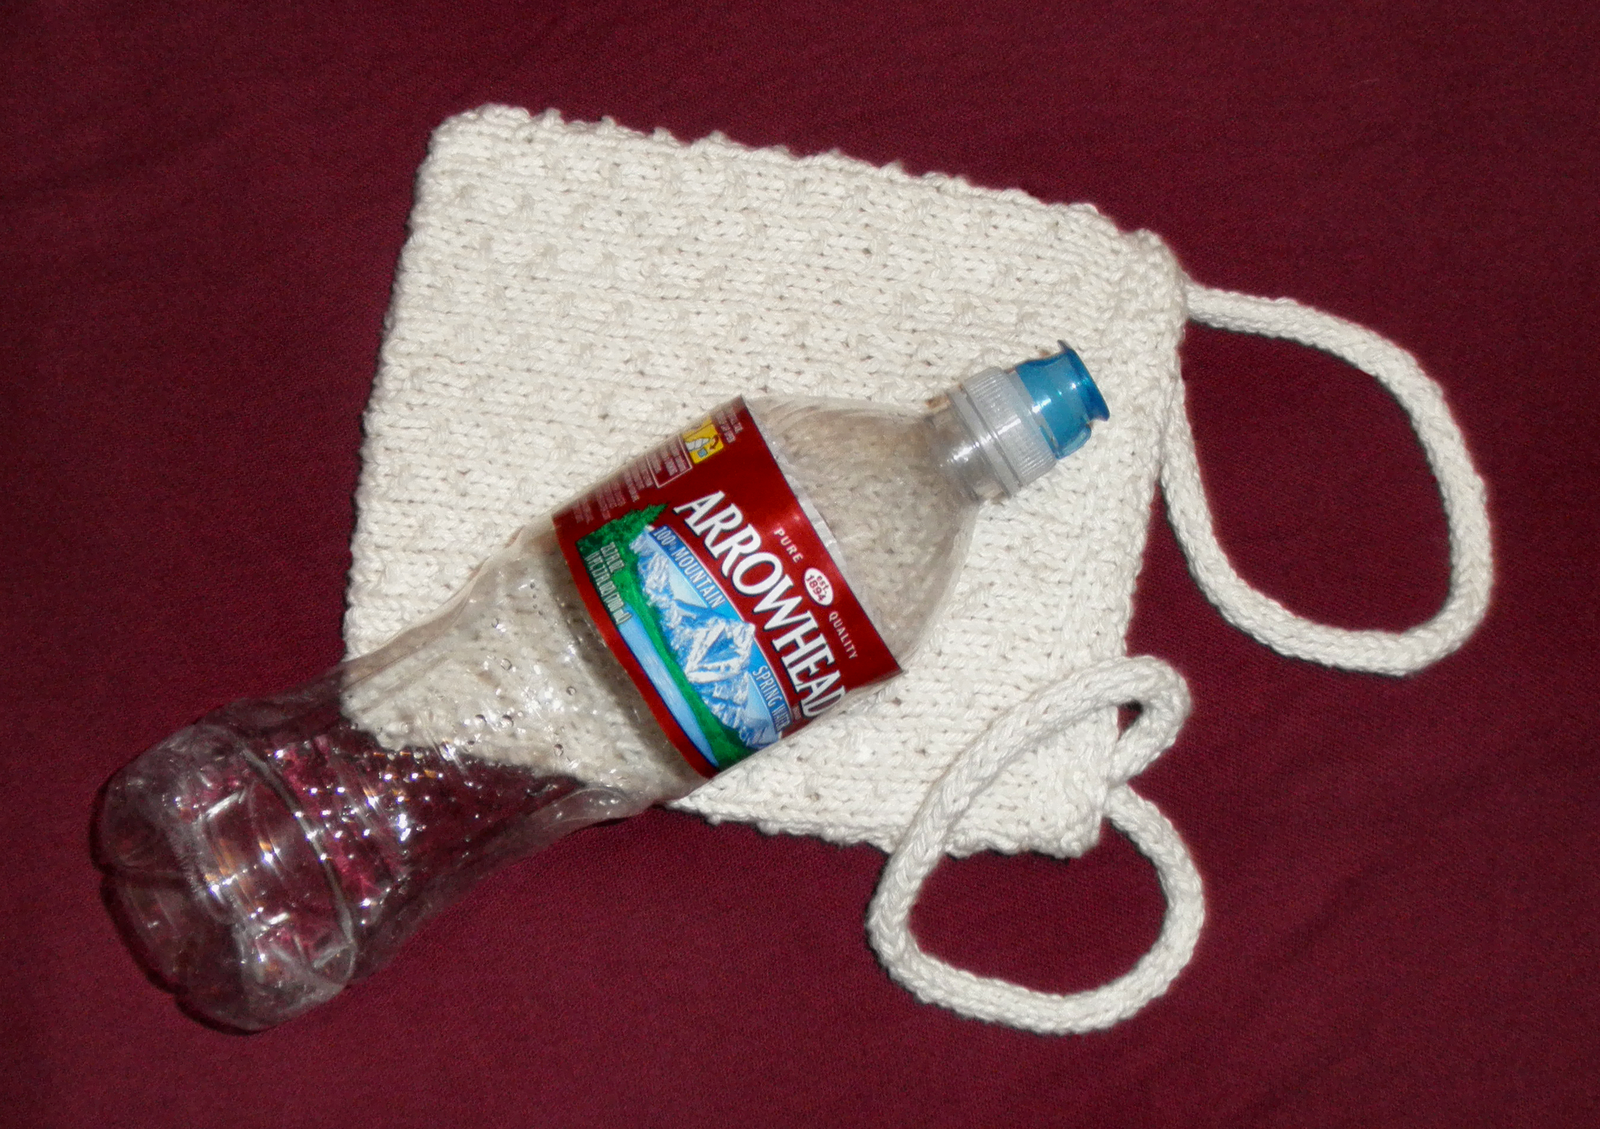
Yarn: kitchen cotton, linen, blend, or other worsted weight yarn that doesn't stretch. (I used Peaches and Creme Ecru, I'm guessing about 40 yards or summat, probably a little less.


Stitch Pattern One  (probably has a name but I don't know it.)
Row 1: p1, k3, repeat
Row 2: purl all stitches
Row 3: k1, p1, k2, repeat
Row 4: purl all stitches

Stitch Pattern Two  (Half Linen Stitch)
Row 2:  k1, slip 1, repeat
Row 2: purl all stitches

The stitch patterns above are for knitting flat. When knitting in the round, reverse all even numbered rows.

Cast on 56 stitches

I like Judy's Magic Cast On. If you'd rather seam the bottom, be my guest. Use your favorite cast on, and join to work in the round. If you'd rather work flat and don't know how to change the pattern to do so, leave me a comment; I'll 'splain. If you want to make a different size, and don't know how to do the math, tell me where you're lost, and I will happily show you, but I'll leave you to figure it out. Deal? Deal.

Round 1: p1, k3, repeat around.
Round 2: knit
Round 3: k1, p1, k2, repeat around.
Round 4: knit
Repeat these four rounds 12 times (48 rounds total) or until bag measures 7.5" deep
Knit next four rounds
Rounds 53, 55, and 57: k1, slip 1, repeat around
Round 54, 56, and 58: knit
Round 59: purl
Round 60: purl

Bind off.

Straps (make 2):
Cast on 4 stitches. Knit as i-cord until desired length is reached. (I did 60 repeats.)

The person in the demo I've linked says "you must use a double pointed needle." Actually, you don't must. I usually use a circular needle because--like an idiot--I gave away all my dps when I moved, but you can make it with single points if necessary. Just slide the stitches to a second needle without knitting them, and start knitting on the one that is now in front. When you've knitted all of them, lather, rinse, repeat until your i-cord is the desired length, or until you will have to rip out your hair or poke out your own eyes with your needle(s) if you try to make One.More.Stitch. If you can cajole or bribe someone to make it for you, so much the better.

Attach the straps securely two rows down and four stitches in from the top and sides. Weave in the ends and call it done. Let me know if you have any problems with the pattern. Other problems? Get a shrink.


This pattern is for personal use only. Feel free to share it with others, but it may not be sold.


Wednesday, June 13, 2012

+2 to Charisma

I made this to use as a dice bag, but it would be excellent for gifts, a cell phone cozy, a belt pouch, or something like that. Because it's technically lace (meaning; it has holes) stuffing it with things small enough to fall out (about 1/4" in diameter) is probably not a good idea, unless you want a believable reason for "losing" said things.


It's worked from the bottom up, in the round. I use a “toe up” cast on because I don't like seaming; otherwise cast on as you would normally do (long tail, knit, or cable cast on would all work just fine) and then seam the bottom as part of your finishing. This one is done with a figure eight, because I hadn't yet discovered Judi's Magic Cast On. The results are very similar, I think Judi's is easier.


The lace design is the same as the Hourglass Eyelet from the 365 Knitting Stitches a Year calendar, but the bag itself is my own original design. Many thanks to Cyndi for test knitting and pointing out needed corrections. Feel free to use personally or share, but this pattern may not be sold or published for commercial use.

The finished piece is about 5” wide and 6” tall. I used about 30 grams of Peruvian sport weight merino wool from Elann, and U.S. 6 needles. Gauge is approximately 7 stitches to the inch in garter stitch. I've written the one set of decreases as “ssk” rather than “s1, k1, psso,” simply because it's easier to write, but I actually use the s1, k1, psso technique. Either one will work just fine.

Cast on 40 stitches and join, being careful not to twist. Mark beginning of round.
Round 1, 3, 5, and 7: knit
Round 2, 4, 6, and 8, purl
Round 9: p1, k6, p1, k5, p1, k6, p1, k6, p1, k5, p1, k6
Round 10: p2, k5, p1, k5, p1, k5, p3, k5, p1, k5, p1, k5, p1
Round 11: *p1, k1, yo, ssk, p, k2tog, yo, k1, yo, ssk, p1, k2tog, yo, k1, yo, ssk, p, k2tog, yo, k1, repeat from * to end
Round 12: p2, k2, p1, k5, p1, k5, p1, k2, p3, k2, p1, k5, p1, k5, p1, k2, p1 
Round 13: *p1, k3, p1, k5, p1, k5, p1, k3, repeat from * to end
Round 14: Repeat round 12

Round 15: *p1, k1, k2tog, yo, k1, yo, ssk, p1, k2tog, yo, k1, yo, ssk, p1, k2tog, yo, k1, yo, ssk, k1, repeat from * to end. 
Round 16: Repeat round 10
Rounds 17 through 25: repeat pattern from rounds 9 through 16.
Round 26: knit
Round 27: (eyelet row) *k2, yo, ssk, repeat from * to end
Round 28, 30, 32, and 34: knit
Round 29, 31, and 33, purl
Bind off


Finishing:
Seam bottom if you didn't use a "closed" cast on, weave in ends, and block. Thread an 18” i-cord, ribbon, or material of your choice through the row of eyelets for a drawstring. (I crocheted a 54” chain, then used that chain to crochet an 18” chain because making i-cord on circulars is a pain, and I'm lazy.)

Fill with dice, treasures, dreams, promises, silliness or whatever you like. 

Friday, June 8, 2012

TreMENDedous Socks

I made these for my friend Jeff. He has humongous feet, and they took forever.


I actually finished them in December of 2010. He somehow managed to tear a hole in one of them. He asked if I could mend them. The pattern is Kim Goddard's Beginner socks, which is the first one I ever used, and still a favorite.

(How does one tear the sole of a sock? I have no idea.)

I’ve never mended socks before, and had recently used up the leftover green/gray yarn. Of course. I had some scraps of the maroon/burgundy, so used that.

I pretty much just frogged out the torn bits of yarn, and tied them at the sides with a tiny square knot. (I don’t usually like to put knots in socks, but I couldn’t think of any other way to secure them.) Then I picked up the loops (8 of them) at the bottom of the hole as if they were a provisional cast on. Knitted two rows, weaving the yarn through the stitch at each side, then grafted to the loops on the top. For a first try at mending, I’m fairly pleased.

Aside from the hole, they’ve worn like iron, and have gotten even softer with wear, and he loves them, so I learned something worthwhile and he’s a happy man. Yeah, these last two pictures kind of remind me of lady parts, too.

Inside


Thursday, June 7, 2012

Brick Road Socks


The socks are done.  I wore them to bed last night, and had warm happy feet. They're actually a little too big, so I'm going to reblock them, and see if I can shrink them a small amount without too much felting. The Regia yarn is superwash. The Knitpicks--isn't. I know, I know. But I made these from scraps from other projects. One works with what one has.

I was looking for a toe up sock pattern on Ravelry, and Hermione's Everyday Socks by Erica Lueder came up. It's NOT toe-up. However, I've never met a pattern I didn't feel the need to rewrite at least a little, and I really liked the look of this one, so ever so blithely decided to convert it. (Pattern notes are below.)  The pattern and yarn remind me of the brick paved street in the small town where I grew up. It’s warm and soft, just a little rugged looking, and quite comforting. Since I've been quite homesick lately, this is a good thing.


I knit rather loosely. I used a combination of Knit Picks Palette and Regia 4-ply on size 1 needles, for a gauge of 7 stitches to the inch. They took about 200 yards of yarn; roughly 80 grams, total. They would have been better at 8 or 9 stitches per inch, but my size 0 needles broke. Increase or decrease by multiples of four for tighter or looser gauge, or to make your socks smaller or larger. The size I made is about a women's U.S. 9.

This pattern is fairly adaptable. I've written it for  Magic Loop, feel free to change to suit dpns, 2AAT, or whatever tickles your fancy. Because knitting should. Tickle one's fancy, I mean.

(If you use this pattern as I've written it, and find errors, PLEASE let me know? Thank you.) 

Toe:
Cast on 24 stitches (I used Judy’s Magic Cast On.) Mark beginning of round.
Round 1: Knit
Round 2: K2, M1 (I used Techknitter’s Nearly Invisible Increase), knit to two stitches from end of first needle, M1, K2 (14 stitches on first needle.) Repeat on second needle. (26 stitches total.)
Repeat these two rounds eight times. (17 rounds total, 28 stitches on each needle, 56 stitches in all.)
Knit 4 rounds even. If changing yarn, switch to main color, knit one round. (22 rounds in all.)

Foot:
Round 1: k1, p1, k2, repeat five times, k1, p1, k2 (28 stitches on first needle, this will be the to top of the foot,) knit 28 stitches (second needle, this will be the bottom of the foot,) to complete the round.
Round 2: knit
Round 3: k3, p1, repeat five times, k3 (end of first needle), k28 to complete the round.
Round 4: knit
Repeat until sock measures 5” (or about 55% of total desired foot length.) End with round 2 or round 4.
Increase for gussets:
Round 1: Knit the stitches on the first needle in pattern, on the second needle, k2, M1, k24, M1, k2. (30 stitches on needle)
Round 2: Knit
Repeat these two rounds ten more times (50 stitches on needle 2)

Regarding the heel: Short row heels--while pretty--don’t fit my funky shaped feet very well, and I prefer a slightly rounded (French) to a square (German) heel. I also prefer using paired decreases for making short rows to the “wrap and turn” technique. (I only despise w&t with the fire of 97 suns, but if I can avoid it, I will.) For these socks; I wanted the Regia yarn on the bottom as well as the back of the heel, because it is reinforced with nylon, and will be longer wearing.

I originally planned to make Maia Spins Toe Up Gusseted Heel) but couldn’t wrap--no, the pun wasn’t intended--my brain around doing that while also changing the yarn, purling the edge stitches, and using an  slipped half linen stitch pattern going up the back of the sock. I’m sure it can be done, but my technical skills just aren’t quite up to it. Maybe next time.

This is what I did instead. It’s a little funky, but it fits well and I think it looks pretty good.

Heel Shaping Part I:
A “half moon” will be made with short rows worked on the 26 stitches in the center of needle two, leaving 12 unworked “gusset” stitches on each side. These unworked stitches will be picked up and worked into the sides of the heel cup and flap, later on. If it’s easier to slip these stitches to the other needle or to cable needles to keep them out of the way until it’s their turn to be worked, feel free.

Row 1: If using a contrast yarn; skip the first 12 stitches on the needle, join at stitch 13. k26, turn. (If not changing yarn, knit across 38 stitches. Turn.)
Row 2: (wrong side) Slip 1st stitch, purl across to three stitches from end, p2tog, p1, turn.
Row 3: Slip 1st stitch, knit across to to three stitches from end (or gap--or 15 stitches--if the gusset stitches on the working needle), ssk, k1, turn.
Repeat these two rows, decreasing one stitch per row, for a total of 19 rows. (There should be seven "live" stitches left in the center of the row.)

Heel Shaping Part II:
Round 1: (WS) pick up 7 stitches along the decreased edge as if to purl. Pick up the next 3 stitches along that edge as if to knit. Slip the first stitch of the "live" gusset stitches onto the right hand needle, slip the final picked up stitch over and off. Turn. (17 stitches on needle)
Round 2: (RS) s1, p2, k14, pick up 7 stitches along the decreased edge as if to knit, pick up the next 3 stitches along that edge as if to purl. Knit the next stitch together with the first live gusset stitch. Turn. (27 stitches on needle.)
Round 3: s1, k2, p21, k2, p1, p next stitch together with the live gusset stitch next to it. Turn
Round 4: s1, p2, (k1, s1 wyif) 10 times, k1, p2, knit next stitch together with the adjacent live gusset stitch, turn.
Repeat rounds 3 and 4 until all gusset stitches have been picked up and decreased into heel. (19 more times)

Leg:
Switch to main color if changing colors. (I like Techknitter's jogless stripes method for color changes.
Round 1 Work instep in pattern previously established, continue across heel stitches in same pattern, M1 (either kfb or lift from the stitch below). (56 stitches total) 
Round 2: Work in pattern around.
Repeat rounds 1 and 2 until desired length is reached, approximately 38 more times.  (Mine is 3.5 inches from the top of the heel flap.)
Change color for ribbing, if desired.

Ribbing:
Round 1: k1, p1, around
Repeat Round 1 until desired length is reached, approximately 15 more times. (Mine is 1.5 inches).

Bind Off with Jeny's surprisingly stretchy bind off. 

Weave in ends, yada yada yada, wash, block, yada, yada, yada,

ENJOY. 

I Despise Computer Programs When--

I accidentally do a thing that isn't what I want it to do, and a program won't let me UNDO it. Particularly when it causes me to lose the half finished post I was trying to put up. I just want to put my freaking pictures where I want them to go, please and thank you. I don't want them left, right, or bloody centered, I want them in various places all over the page, and I don't appreciate having to freaking learn how to bloody code to make happen, or have the whole thing turn into just the image with no way to get back to where I was. 

 GRRRRR.

On that note, I'm going to go away from this for a while. And think about whether I want to create a WordPress blog instead.

Edit: I downloaded WordPress to look at it. It doesn't pretend to be easy, at least, and has very explicit instructions for setting it up, which--unfortunately--assumes knowledge I either don't have or am pretty fuzzy about,  What I do know doesn't map over as well as I'd like. So maybe not, at least not right now. When I'm ready to learn me a bunch of new computer stuff, maybe. 

Friday, June 1, 2012

Helen's Bag of Holding

I finished Helen's Bag of Holding a month ago, (after a year and a complete redo!) and really like the way it turned out. The pattern is Linda Skinlo's Let's Go Shopping Market Bag.


I used Jil Eaton Cottontail yarn; around two 50 gram skeins. It's supposedly a "sport" weight, I'd call it a DK. I'm too lazy to fish some out and figure wpi (wraps per inch) but I may do that one of these days. I knit very loosely, so used U.S. size 5 needles (3.75 mm). (Fibergypsy has a great needle sizing chart here.) If your knitting is on the tight side, go up a needle size, or even two. Gauge isn't that important on something like this, unless you've got a limited amount of yarn, but it's handy to know what yours is likely to be.

No, I didn't swatch. *rolls eyes* If I had, I might not have decided to frog the whole thing and start over when it came out too bloody big the first time, but it probably wouldn't have made a difference if I had. For an accounting type person who loves math, I can be seriously clueless. Give me algebra and spreadsheets, I'm in hog heaven. Geometry, not so much. Why CAN'T two solid physical objects occupy the same space at the same time?

 Gathering all the links and tricks and tips and patterns and stuff I've collected is on the project list too.

Why can't American women figure sizes? It's because their men have told them it's eight inches when it's really six. *heh* The clothing makers lie to us too. A LOT. But that's a rant for a different post, possibly a different blog. 


I didn't like the garter stitch straps on the original pattern. Besides, it doesn't indicate where they should be attached. So--96 stitches, divided by 4, no by 8, no, subtract 40 then divide by--oh bloody hell. Screw that. I redid them as i-cord. I wanted to place them evenly around, and attach each end to four stitches on the border. Which is two rows of single crochet, by the way. I'll try an attached i-cord on the next bag I make, which WON'T be this pattern. (I like it, but I've made it three times, and I'm ready for something different.) The i-cord handles are placed 20 stitches apart, btw. (96 -16 = 80. 80/4 = 20. In case you were wondering.)